Pages

Saturday, December 22, 2007

A Very Daring Yule Log

Daring Baker's Challenge - The Yule Log

This was my first Daring Bakers challenge. Yikes, what a big one! Not only was I swamped with other Christmas baking, but now, I find out I have to bake a Yule Log, complete with Marzipan mushrooms. And, we found out that we got approved to move into a new house NEXT weekend! It's been a busy but exciting month.

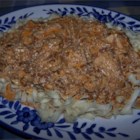
My finished Yule Log - I love it!

My little Marzipan mushrooms

My buttercream - not too bad for my first try! And SO rich and yummy!

I decided to make my buttercream in chocolate flavor, since, while my husband LOVES coffee, he's not such a fan of coffee flavored sweets for some reason. I followed the idea from fellow DBer, The Caked Crusader, to add dark chocolate bars to flavor the frosting. I chose to make the marzipan mushrooms as well, rather than the meringue.

My sheet pan is 12x17, so I increased the recipe by 4/3, as suggested by another DBer. I used 4 eggs, 4 yolks, a pinch of salt, 1 C sugar, and 1 C combined cake flour and cornstarch. I also flavored it with Frangelico, a hazelnut flavored liqueur. SOOO tasty! I also increased the buttercream recipe by 4/3, using 6 egg whites, 1 lb of butter, and 1 1/3 C sugar. I melted 7 little dark chocolate sticks into the butter, and used 2 T of Frangelico in place of the rum or brandy.

I had no problems with the genoise. It was super easy, and I rolled it when it was about halfway cooled, with a sheet of parchment on both sides. I let it cool overnight, wrapped in saran wrap. It was super moist the next morning. The butter cream was NOT what I remembered making as a child...it did curdle a bit, but not as bad as I was afraid it would. It spread easily inside the cake. The hardest part was frosting the cake, but luckily the wood texture hid any funny spots! I decorated it with the marzipan mushrooms, rosemary, and cranberries.

The Yule Log came out great. It was hard to frost...it kept trying to pull pieces of the cake off, and the icing was melting fast. But, I overcame it, and it turned out beautifully! :)

Here is the basic recipe, before the substitutions I made:

Yule Log

Plain Genoise: (I added Frangelico to mine)

3 large eggs
3 large egg yolks
pinch of salt
¾ cup of sugar
½ cup cake flour - spoon flour into dry-measure cup and level off (also known as cake & pastry flour)
2 Tablespoons cocoa powder if desired
¼ cup cornstarch

one (1) 10 x 15 inch jelly-roll pan that has been buttered and lined with parchment paper and then buttered again

1.Set a rack in the middle of the oven and preheat to 400 degrees F.

2.Half-fill a medium saucepan with water and bring it to a boil over high heat. Lower the heat so the water is simmering.

3.Whisk the eggs, egg yolks, salt and sugar together in the bowl of a heavy-duty mixer. Place over the pan of simmering water and whisk gently until the mixture is just lukewarm, about 100 degrees if you have a therm ometer (or test with your finger - it should be warm to the touch).

4.Attach the bowl to the mixer and, with the whisk attachment, whip on medium-high speed until the egg mixture is cooled (touch the outside of the bowl to tell) and tripled in volume. The egg foam will be thick and will form a slowly dissolving ribbon falling back onto the bowl of whipped eggs when the whisk is lifted.

5.While the eggs are whipping, stir together the flour, cocoa and cornstarch.

6.Sift one-third of the flour mixture over the beaten eggs. Use a rubber spatula to fold in the flour mixture, making sure to scrape all the way to the bottom of the bowl on every pass through the batter to prevent the flour mixture from accumulating there and making lumps. Repeat with another third of the flour mixture and finally with the remainder.

7.Scrape the batter into the prepared pan and smooth the top.

8.Bake the genoise for about 10 to 12 minutes. Make sure the cake doesn't overbake and become too dry or it will not roll properly.

9.While the cake is baking, begin making the buttercream.

10.Once the cake is done (a tester will come out clean and if you press the cake lightly it will spring back), remove it from the oven and let it cool on a rack.

Coffee Buttercream: ( I used chocolate buttercream instead, see recipe below)

4 large egg whites
1 cup sugar
24 tablespoons (3 sticks or 1-1/2 cups) unsalted butter, softened
2 tablespoons instant espresso powder
2 tablespoons rum or brandy

OR:

Chocolate Buttercream
4 Lg egg whites
1 Cup sugar
3 sticks softened butter
1/2 Cup melted chocolate chips

1.Whisk the egg whites and sugar together in the bowl of an electric mixer. Set the bowl over simmering water and whisk gently until the sugar is dissolved and the egg whites are hot.

2.Attach the bowl to the mixer and whip with the whisk on medium speed until cooled. Switch to the paddle and beat in the softened butter and continue beating until the buttercream is smooth. Dissolve the instant coffee in the liquor and beat into the buttercream.

Chocolate Buttercream directions:
1. same as above number 1
2.
Attach the bowl to the mixer and whip with the whisk on medium speed until cooled. Switch to the paddle and beat in the softened butter and continue beating until the buttercream is smooth. Slowly stir in melted chocolate.

Marzipan Mushrooms:

8 ounces almond paste
2 cups icing sugar
3 to 5 tablespoons light corn syrup
Cocoa powder

1.To make the marzipan combine the almond paste and 1 cup of the icing sugar in the bowl of an electric mixer and beat with the paddle attachment on low speed until sugar is almost absorbed.

2.Add the remaining 1 cup of sugar and mix until the mixture resembles fine crumbs.

3.Add half the corn syrup, then continue mixing until a bit of the marzipan holds together when squeezed, adding additional corn syrup a little at a time, as necessary: the marzipan in the bowl will still appear crumbly.

4.Transfer the marzipan to a work surface and knead until smooth.

5.Roll one-third of the marzipan into a 6 inches long cylinder and cut into 1-inch lengths.

6.Roll half the lengths into balls. Press the remaining cylindrical lengths (stems) into the balls (caps) to make mushrooms.

7.Smudge with cocoa powder.

Assembling the Yule Log:

1.Run a sharp knife around the edges of the genoise to loosen it from the pan.
2.Turn the genoise layer over (unmolding it from the sheet pan onto a flat surface) and peel away the paper.
3.Carefully invert your genoise onto a fresh piece of parchment paper.
4.Spread with half the coffee buttercream (or whatever filling you're using).
5.Use the parchment paper to help you roll the cake into a tight cylinder.
6.Transfer back to the baking sheet and refrigerate for several hours.
7.Unwrap the cake. Trim the ends on the diagonal, starting the cuts about 2 inches away from each end.
8.Position the larger cut piece on each log about 2/3 across the top.
9.Cover the log with the reserved buttercream, making sure to curve around the protruding stump.
10.Streak the buttercream with a fork or decorating comb to resemble bark.
11.Transfer the log to a platter and decorate with your mushrooms and whatever other decorations you've chosen.

Tuesday, December 18, 2007

Hazelnut Cheesecake

Hazelnut Cheesecake

Frangelico gives the cheesecake a delicate hazelnut taste, while chopped hazelnuts in the crust add crunch and more nutty flavor. You can use Amaretto (almond-flavored liqueur) and almonds instead.

Ingredients

Crust:
1 cup reduced-fat vanilla wafer crumbs (about 30 cookies)
3 tablespoons sugar
3 tablespoons finely chopped hazelnuts, toasted
1 tablespoon butter, melted
Cooking spray

Filling:
2 (8-ounce) blocks 1/3-less-fat cream cheese, softened
1 (8-ounce) block fat-free cream cheese, softened
1 cup fat-free sour cream
1 1/3 cups sugar
2 tablespoons all-purpose flour
1/4 teaspoon salt
4 large egg whites
1 large egg
1/4 cup Frangelico (hazelnut-flavored liqueur)
2 teaspoons vanilla extract

Preparation

Preheat oven to 400°.

To prepare crust, combine first 3 ingredients in a medium bowl. Drizzle with butter; toss with a fork until moist. Press mixture into bottom of a 9-inch springform pan coated with cooking spray. Bake at 400° for 7 minutes or until lightly browned. Cool on a wire rack.

Reduce oven temperature to 325°.

To prepare filling, place cheeses in a large bowl; beat with a mixer at medium speed until smooth. Add sour cream; beat until combined. Combine 1 1/3 cups sugar, flour, and salt, stirring with a whisk. Beating at low speed, gradually add sugar mixture to cheese mixture. Add egg whites and egg, 1 at a time, beating well after each addition. Beat in liqueur and vanilla. Pour mixture into prepared pan. Bake at 325° for 1 hour or until cheesecake center barely moves when pan is touched. Remove cheesecake from oven; run a knife around outside edge. Cool to room temperature. Cover and chill at least 8 hours.

Yield

16 servings (serving size: 1 wedge)

Nutritional Information

CALORIES 238(33% from fat); FAT 8.6g (sat 4.6g,mono 2.9g,poly 0.4g); PROTEIN 7.4g; CHOLESTEROL 38mg; CALCIUM 69mg; SODIUM 184mg; FIBER 0.2g; IRON 0.4mg; CARBOHYDRATE 31.3g

Ann Pittman , Cooking Light, OCTOBER 2006

Roasted-Pear Stuffing

Roasted-Pear Stuffing

You can substitute apples for the pears. If you have pear brandy, by all means use it in place of the sherry and brandy.

Ingredients

2 teaspoons olive oil
4 cups sliced peeled Bosc pear (about 3 1/2 pounds)
1 cup diced onion
1 cup diced peeled celeriac (celery root)
3 garlic cloves, minced
1/2 cup dry sherry
1/2 cup brandy
5 cups (1/2-inch) cubed dense white bread (about 8 ounces)
1 cup fat-free, less-sodium chicken broth
1/2 cup chopped hazelnuts, toasted
2 teaspoons chopped fresh or 1/2 teaspoon dried thyme
1/2 teaspoon salt
1/4 teaspoon freshly ground black pepper
2 large eggs, lightly beaten

Preparation

Preheat oven to 350°.

Heat the oil in a large nonstick skillet over medium-high heat. Add pear slices, and cook, without stirring, 2 minutes or until golden brown. Carefully turn pear slices; cook for 2 minutes or until golden brown. Add onion, celeriac, and garlic; saute 3 minutes or until lightly browned. Add sherry and brandy, and cook until liquid almost evaporates. Remove from heat; cool.

Combine pear mixture, bread, and remaining ingredients in a large bowl, tossing gently. Spoon the bread mixture into a 2-quart casserole. Cover with lid, and bake at 350° for 45 minutes or until thoroughly heated.

Yield

12 servings (serving size: 2/3 cup)

Nutritional Information

CALORIES 167(30% from fat); FAT 5.6g (sat 0.8g,mono 3.6g,poly 0.7g); PROTEIN 4.2g; CHOLESTEROL 37mg; CALCIUM 51mg; SODIUM 265mg; FIBER 2.4g; IRON 1.2mg; CARBOHYDRATE 26.4g

Cooking Light, NOVEMBER 2000

Apple Cider Brined Turkey with Savory Herb Gravy

This turkey is decadent. I made it several years ago, and people are still talking about how it was the best turkey they've eaten in their lives. I am definitely making it again!!!!

Apple Cider-Brined Turkey with Savory Herb Gravy

This turkey is a pleasure to offer on your table. It's incredibly moist and flavorful, and it received our highest Test Kitchens rating. Brining is an overnight process, so if you're using a frozen turkey, be sure to thaw it well in advance. Choose turkey-sized plastic oven bags for brining the turkey. Use two bags to prevent brine from leaking, and place the turkey in a large stockpot as another precaution.

Ingredients

Brine:
8 cups apple cider
2/3 cup kosher salt
2/3 cup sugar
1 tablespoon black peppercorns, coarsely crushed
1 tablespoon whole allspice, coarsely crushed
8 (1/8-inch-thick) slices peeled fresh ginger
6 whole cloves
2 bay leaves
1 (12-pound) fresh or frozen turkey, thawed
2 oranges, quartered
6 cups ice

Remaining ingredients:
4 garlic cloves
4 sage leaves
4 thyme sprigs
4 parsley sprigs
1 onion, quartered
1 (14-ounce) can fat-free, less-sodium chicken broth
2 tablespoons unsalted butter, melted and divided
1 teaspoon freshly ground black pepper, divided
1/2 teaspoon salt, divided
Savory Herb Gravy

Preparation

To prepare brine, combine first 8 ingredients in a large saucepan; bring to a boil. Cook 5 minutes or until sugar and salt dissolve. Cool completely.

Remove giblets and neck from turkey; reserve for Savory Herb Gravy. Rinse turkey with cold water; pat dry. Trim excess fat. Stuff body cavity with orange quarters. Place a turkey-sized oven bag inside a second bag to form a double thickness. Place bags in a large stockpot. Place turkey inside inner bag. Add cider mixture and ice. Secure bags with several twist ties. Refrigerate for 12 to 24 hours, turning occasionally.

Preheat oven to 500º.

Remove turkey from bags, and discard brine, orange quarters, and bags. Rinse turkey with cold water; pat dry. Lift wing tips up and over back; tuck under turkey. Tie legs together with kitchen string. Place garlic, sage, thyme, parsley, onion, and broth in the bottom of a roasting pan. Place roasting rack in pan. Arrange turkey, breast side down, on roasting rack. Brush turkey back with 1 tablespoon butter; sprinkle with 1/2 teaspoon pepper and 1/4 teaspoon salt. Bake at 500º for 30 minutes.

Reduce oven temperature to 350º.

Remove turkey from oven. Carefully turn turkey over (breast side up) using tongs. Brush turkey breast with 1 tablespoon butter; sprinkle with 1/2 teaspoon pepper and 1/4 teaspoon salt. Bake at 350º for 1 hour and 15 minutes or until a thermometer inserted into meaty part of thigh registers 170º (make sure not to touch bone). (Shield the turkey with foil if it browns too quickly.) Remove turkey from oven; let stand 20 minutes. Reserve pan drippings for Savory Herb Gravy. Discard skin before serving; serve with gravy.

Note: Nutritional analysis includes Savory Herb Gravy.

Yield

12 servings (serving size: 6 ounces turkey and 3 tablespoons gravy)

Nutritional Information

CALORIES 338(30% from fat); FAT 11.3g (sat 4.2g,mono 2.5g,poly 3g); PROTEIN 51.3g; CHOLESTEROL 138mg; CALCIUM 45mg; SODIUM 770mg; FIBER 0.1g; IRON 3.3mg; CARBOHYDRATE 4.5g

Diane Morgan , Cooking Light, NOVEMBER 2004

Grilled Pastrami-Style Salmon

Grilled Pastrami-Style Salmon

(Recipe taken from CookingLight.com)

The classic seasonings associated with beef pastrami taste fantastic on this grilled salmon. Allspice is a fairly strong spice, so if you're sensitive to its "burn," use the lesser amount. Purchase a whole center-cut salmon fillet so that it will cook more evenly than a cut that contains the thinner tail end.

Ingredients

1 tablespoon dark brown sugar
1 teaspoon kosher salt
1 teaspoon garlic powder
1 teaspoon ground ginger
1 teaspoon ground coriander
1 teaspoon coarsely ground black pepper
1/4 to 1/2 teaspoon ground allspice
1 (1 1/2-pound) center-cut salmon fillet
1/2 teaspoon olive oil
Cooking spray

Preparation

Prepare grill.

Combine first 7 ingredients. Place salmon fillet, skin side down, on a cutting board or work surface; brush evenly with olive oil. Sprinkle spice mixture evenly over salmon; gently rub mixture into fish. Cover lightly with plastic wrap, and chill 15 minutes.

Place fish, skin side down, on a grill rack coated with cooking spray; grill 10 minutes or until fish flakes easily when tested with a fork.

Yield

4 servings (serving size: about 4 1/2 ounces)

Nutritional Information

CALORIES 230(41% from fat); FAT 10.5g (sat 2.4g,mono 4.7g,poly 2.4g); PROTEIN 27.4g; CHOLESTEROL 65mg; CALCIUM 26mg; SODIUM 532mg; FIBER 0.6g; IRON 0.8mg; CARBOHYDRATE 4.9g

Chicken Parmesan

Mike and I adore Chicken Parmesan. I haven't used a recipe in years. I'll just give you my process, and I'll try to add pictures next time I make it.

Chicken Parmesan
a'la Alanna

Chicken Breasts
egg
milk
panko (or fine bread crumbs)
flour
Italian seasoning
salt
pepper
olive oil
Italian cheese (i.e. provolone, mozzarella, etc.)
Spaghetti sauce
spaghetti

First, I trim all the fat from the chicken breasts, because it totally grosses me out. Then, I salt & pepper the breasts.

Put flour in a small bowl.

Place an egg and some milk in a bowl and gently beat them together.

Put bread crumbs in a bowl with Italian seasoning.

Dip the breasts in the flour and gently coat them. Then, dip them into the egg/milk mixture and let the excess drip off.

Place the breasts in the dish of bread crumbs, and firmly press into the crumbs to thoroughly coat all sides.

Heat the olive oil in a skillet. Fry chicken for a couple minutes on each side until golden. Reduce heat and cover. Cook until chicken is white and tender all the way through. Place a slice of cheese on top of each breast. Cover and cook until cheese is melted.

Serve with spaghetti and sauce.

Udon Soup

I have yet to try this one, but it sounds good. I couldn't find the Dashi though, so I think I'm just going to use chicken broth. It might also work if you boil the water with those seaweed sheets in it.

Nabeyaki Udon

(Japanese noodle soup with egg and vegetable)

Garnish: sprinklings of shichimi (a 7-spice mixture with inactive marijuana seeds in it!) or crushed red pepper.

1. Preheat the oven to 375 degrees.

2. Cook the udon noodles. Drain, rinse, and let sit til you're ready to assemble the soup.)

3. Cut a deep cross into the tops of the hydrated mushroom caps (throw out the stems) and cook them uncovered in a small pot with the reserved mushroom liquid, the soy sauce, and the sugar on medium heat until tender and the liquid is absorbed--about 10-15 minutes.

4. Bring the stock to a boil, then reduce heat and let simmer.

5. Bring water to a boil in a small pan, then blanch the spinach leaves for 30 seconds, remove, and let drain.

6. Cut the spinach into 2-inch pieces; the leeks into 1-inch diagonal slices; and the chicken breast into 4 equal slices, sprinkling with salt and sake.

To assemble the soup:

  1. Divide noodles into the 4 large bowls (preheated in the oven).
  2. Arrange the spinach, leeks, carrots, chicken, and mushrooms on top of the noodles, around the sides (leaving the center clear for the eggs).
  3. Pour the boiling stock equally into the bowls.
  4. Cover and put in the oven for 2-3 minutes.

Serve immediately. Pass the shichimi or red pepper separately.

Peanut Butter Noodles

Peanut Butter Noodles
(recipe taken from Allrecipes.com)

This is one of our all-time favorites. I think I make it almost once a week. Mike loves it! It's great with shrimp or chicken. I just cook the meat in soy sauce and peanut oil before adding it to the noodles.

"Smooth peanut butter, sweet honey, salty soy sauce, and fiery fresh ginger simmer with chicken broth to make a delectable sauce for boiled udon noodles. Garnish with sliced green onions and more fresh peanuts for a decidedly different dish."
INGREDIENTS:
1/2 cup chicken broth
1 1/2 tablespoons minced fresh
ginger root
3 tablespoons soy sauce
3 tablespoons peanut butter
1 1/2 tablespoons honey
2 teaspoons hot chile paste
(optional)
3 cloves garlic, minced
8 ounces Udon noodles
1/4 cup chopped green onions
1/4 cup chopped peanuts
DIRECTIONS:
1. Bring a large pot of water to a boil. Add noodles and cook until tender according to package directions. Drain.
2. Meanwhile, combine chicken broth, ginger, soy sauce, peanut butter, honey, chili paste, and garlic in a small saucepan. Cook over medium heat until peanut butter melts and is heated through. Add noodles, and toss to coat. Garnish with green onions and peanuts.

My menu for this week

Sooo....I am bored here at work, so I figured I'd update my blog. I don't have any new pictures to add, but I can at least throw out some recipes. :) (I'll try to find as many as I can.)

This is a quick week, since I've decided to cook Christmas dinner on Sunday.

Monday: Chicken Parmesan - This is one of our staples, and a favorite of us both!
Tuesday: Peanut Butter Noodles - This is also one of our favorites.
Wednesday: holiday party with Mike's coworkers
Thursday: Udon Soup
Friday: Chicken & Potato Pizza - this is from my friend Clara's blog...she and our friend April rave about how good it is.
Saturday: Grilled Pastrami-Style Salmon with Roasted Vegetables

Sunday: (all Christmas recipes taken from Cooking Light)

Tuesday, December 4, 2007

Holiday Bread

So, it's the season for holiday baking! I LOVE it, but at the same time, it's not good for my waistline! Yikes!

We were in Panera Bread the other day, and Mike found a little recipe card that said Holiday Bread on it. He read the description and gave me the card, wanting me to bake him the bread. I said of course, I would. Well...I looked closer at the card and realized that it wasn't a recipe for the bread, it was just a recipe for some fruit compote to eat with their bread. Of course they wouldn't give away their secret recipe!!!! So, not wanting to let Mike down, I decided to figure out my own way to make the bread, based on the card description.

Holiday Bread
I used a recipe for Challah bread, which is a slightly sweet egg bread. This actually made a massively huge loaf, so you may want to use half or 2/3 of the recipe.

  • 1 1/2 C skim milk
  • 2 pkg yeast
  • 5 1/2 C flour
  • 1 t salt
  • 1/4 C shortening
  • 1/2 C egg substitute
  • 1 egg yolk
  • 1/2 C honey
  • extra flour
  • 1 egg, slightly beaten (or you can use more egg substitute)
Fillings:
  • 2 apples
  • brown sugar
  • cinnamon
  • chocolate chips
  • craisins (dried cranberries)
  • golden raisins
Streusel Topping:
  • 1/3 C flour
  • 1/3 C chopped walnuts or pecans
  • 1/3 C packed brown sugar
  • 1 1/2 T melted butter
  • 1/2 t ground cinnamon
  • 1/8 t salt
Icing:
  • powdered sugar
  • milk
  1. Preheat oven to 200 degrees. Microwave milk for 2-3 minutes until warm - do not let it boil! Stir in yeast; let stand 5 minutes.
  2. Combine flour and salt in large bowl; stir in yeast mixture. Add shortening, egg substitute, egg yolk, and honey. Beat for 5 minutes.
    (I accidentally forgot the egg yolk, and it turned out okay. Also, I don't have a mixer, so I just mixed it with my hands and it came out great.)
  3. Sprinkle with additional flour, and remove from bowl. Dough will be very sticky. I like to use oil rather than too much additional flour so that the dough won't get too stiff. Place the dough in a lightly greased bowl, turning to grease the top. Turn off the oven. Cover bowl with plastic wrap; let rise in oven for 30 minutes or until doubled. Remove and uncover.
  4. Peel and slice apples - mix with brown sugar and cinnamon to taste.
  5. Punch down dough, divide in 4 sections. Try to make them all slightly different in size. Roll out the smallest section of dough into a rectangle. Spread apple mixture down the center of the dough lengthwise. Roll dough up cinnamon-roll style.
  6. Roll out the next largest ball of dough into a rectangle the same length as the first roll, but a little wider. Sprinkle liberally with chocolate chips. Roll the chocolate chip layer around the apple layer.
  7. Roll out the next ball of dough, and sprinkle with cranberries. Repeat step 6.
  8. Roll out the last ball of dough, and sprinkle with golden raisins. Repeat previous step.
  9. Cover loaf with plastic wrap and let rise in warm, draft free place for 25-30 minutes or until doubled. Brush evenly with beaten egg. Combine all streusel topping ingredients until crumbly, and cover loaf with topping.
  10. Bake at 350 degrees for 25 minutes or until golden. Toothpick inserted in center should come out clean.
    Because my loaf was so massive, it ended up taking closer to 45-50 minutes to bake it all the way through.
  11. Once loaf is completely cool, it is time for icing! I used about 1/2 C of powdered sugar, and slowly added milk, constantly stirring, until it reached the desired consistency. Drizzle over top of loaf.
This turned out really well! It is actually a little sweet for my taste - the combination of all the goodies is a bit much for me, but Mike loves it! I would definitely make it again, but definitely smaller, and I might leave out either the chocolate or the cranberries.

Chicken Pot Pie

Mike and I both love Chicken Pot Pie! I had an old recipe that I adored, but it is quite time-consuming, so I decided I was going to go with the simple way and throw cream of chicken soup in with the veggies. Well, lo and behold, I went to look in my pantry, and there was no soup in there! So, I created my own version of cream sauce for chicken pot pie. Here you have it:

Chicken Pot Pie


  • 2 chicken breasts
  • 1 bag frozen peas & carrots
  • 1 bag frozen broccoli
  • 1 frozen pie crust
  • 2 C chicken broth (or chicken bullion in water)
  • salt
  • pepper
  • thyme
  • parsley
  • 1 onion, chopped
  • 3/4 stick (6 tablespoons) unsalted butter
  • 6 tablespoons all-purpose flour
The great thing about pot pie is that you can use whatever veggies you like. Potatoes are excellent, and corn would be good too. You can always use turkey or beef instead of chicken, as well.

  1. Preheat oven to 425. Boil the chicken until cooked through, then removed it from the stove and shredded it into bite-size pieces.
  2. Boil chicken broth (or bouillon), and add frozen vegetables. Once veggies are cooked, add chicken. Lower heat and simmer.
  3. In another saucepan cook the onion in the butter over moderately low heat, stirring, until it is softened, add the flour, and cook the roux, stirring, for 3 minutes.
  4. Add half of the broth from the veggie mixture in a stream, whisking, and bring the mixture to a boil, whisking. Add the roux to the pan with veggies and chicken. Add thyme, parsley (I use a lot of dried parsley flakes) and salt & pepper to taste.
  5. Place bottom of pie crust in baking pan. Fill pan with veggie & chicken mixture, and place top crust on top of pie. Poke holes in crust with fork.
  6. Bake in preheated oven for 25 minutes or until crust is golden.
  7. Enjoy!
This turned out SO good. Mike adores pot pie...and I must admit, I love it too. :)

Friday, November 2, 2007

Crockpot Chicken Paprikash

Crockpot Chicken Paprikash
with Dumplings


(Recipe adapted from allrecipes.com - photo also from allrecipes.com - I did not use noodles, I added dumplings instead.)

Paprikash ingredients:

  • 1 pound boneless, skinless chicken breasts
  • salt and pepper to taste
  • 1 cup chopped onion
  • 3 tablespoons Hungarian paprika
  • 3/4 cup white wine
  • 3/4 cup chicken broth
  • 1/2 cup sour cream

Directions:

  1. Add chicken and onions to crockpot.
  2. Add paprika, wine, and broth.
  3. Let chicken mixture slow cook for several hours (3-4 hours on high heat or 6-8 hours on low heat).
  4. Stir in 1/2 cup sour cream. Heat through.
Dumpling Ingredients:
  • 1 cup flour
  • 1 teaspoon baking powder
  • 1/2 teaspoon salt
  • 1/6 cup shortening
  • 1/4 cup milk
Combine first 3 ingredients. Cut in shortening, add milk.
Drop small spoonfuls of dumpling mixture into hot crock pot mixture (aim for the liquid areas). Cook for about 15 more minutes.

I served this with steamed broccoli for some color variation. It was delicious! :)

Wednesday, October 31, 2007

Edamame Fried Rice


Edamame Fried Rice

The other night I made some Korean Spicy Beef, and I figured that Fried Rice would be the perfect accompaniment. I found a recipe on allrecipes.com and altered it to my liking.

To keep the rice texture firm, it is recommended to rinse the cold cooked rice and drain it well before adding it to the stir fry. (I didn't do this though, and it turned out okay.)

Ingredients:
1 T canola oil
2 large eggs, lightly beaten
3/4 C minced yellow onion
4 C cooked long-grain rice, chilled - BE SURE TO COOK AND CHILL THE RICE BEFORE STARTING ANYTHING ELSE!
3 T low-sodium soy sauce
1-2 C shredded lettuce (can also use Asian style coleslaw)
1/2 C (or more) shelled edamame (if frozen, be sure to thaw first)
1/4 t salt
1/8 t white pepper
1/2 C minced green onions
1 t dark sesame oil
additional soy sauce to taste

Preparation:
Heat canola oil in large nonstick skillet over medium-high heat. Add eggs; stir-fry for 1 minute or until done. Remove from pan.

Add yellow onion to pan; saute 2 minutes or until translucent. Add rice and soy sauce; stir-fry 2 minutes. Return eggs to pan; cook 1 minute. Stir in lettuce, green peas, salt, and white pepper; stir-fry 1 minute. Sprinkle with green onions, and drizzle with sesame oil and soy sauce.

Yield:
6 servings - I was able to get 2 1/2 good-size meals out of this recipe.

Red Velvet Monster Cupcakes with Cream Cheese Filling

So....all my friends have finally driven me to start my own cooking blog. You will be amazed, I'm sure....

...Or not. I used to be an amazing baker, but my latest project was something of a mess. A tasty mess though, I must add! I figured I would start off my blog with a grand welcome - a photo documentary.


Red Velvet Monster Cupcakes
(with Cream Cheese Filling)

This blog is dedicated to my friend Clara, who wanted to see how I filled my cupcakes. I used a Duncan Hines cake mix for Red Velvet cake. My oh my, was that some red batter! I followed the package instructions for mixing.


After mixing, I went to pour the batter into the muffin tins. Alas - I discovered that my muffin tin did not make it during the move! It must have been left at the bachelor pad. What to do? I found some Halloween cupcake liners in my cupboard, and put them in a baking dish, hoping for the best.
Since I was planning to fill the cupcakes with cream cheese filling, I only filled the tins about 1/4 - 1/3 full.


My next plan of attack was to make the cream cheese filling. I used:
8 oz cream cheese (fat free!)
1/4 cup powdered sugar
1 tsp vanilla
1 egg
red and yellow food coloring :)
I used the mixer until it was smooth, and then put the whole mess into a Ziploc bag and cut off the corner. (For easy cupcake filling.)


Then, I squirted a little filling into the middle of each cupcake.


My oh my, is cream cheese filling yummy!!!


Once I finished eating the leftover filling out of the bag, I carefully filled the cupcakes with the remaining batter, being sure not to let the filling peek out. The cupcake liners were about 3/4 full.


After I popped the cupcakes in the oven for 22 minutes, I got busy licking the beaters and the bowl. I wanted to see just how much food coloring was in that batter.

It's a lot of red, but I think it's a good look for me.

Time to take the cupcakes out of the oven! Oh dear...they are completely deformed - looks like it's not such a great idea to make cupcakes without a muffin tin. :( I'm sure they'll still be tasty though.


When Mike got home from work, we got busy decorating. We used the whipped cream cheese frosting, and added some yellow and red food coloring to it. By the time we were done mixing, it sure wasn't very whipped anymore. It was just gooey. Oh well. We added some Halloweenie candy corns to them. What we got was a frightful mess of gooey cupcakes.


Mike was the first guinea pig. Carefully he takes a bite...


Check out that creamy middle! (And that scary red tongue!)


Overall, the cupcakes were a success. Although I'm embarrassed to show them to anyone else. Next time, I'll be sure to buy the right pan before I try making cupcakes again!